Release 2.18 – Friday, July 22, 2016
Projects Categorization
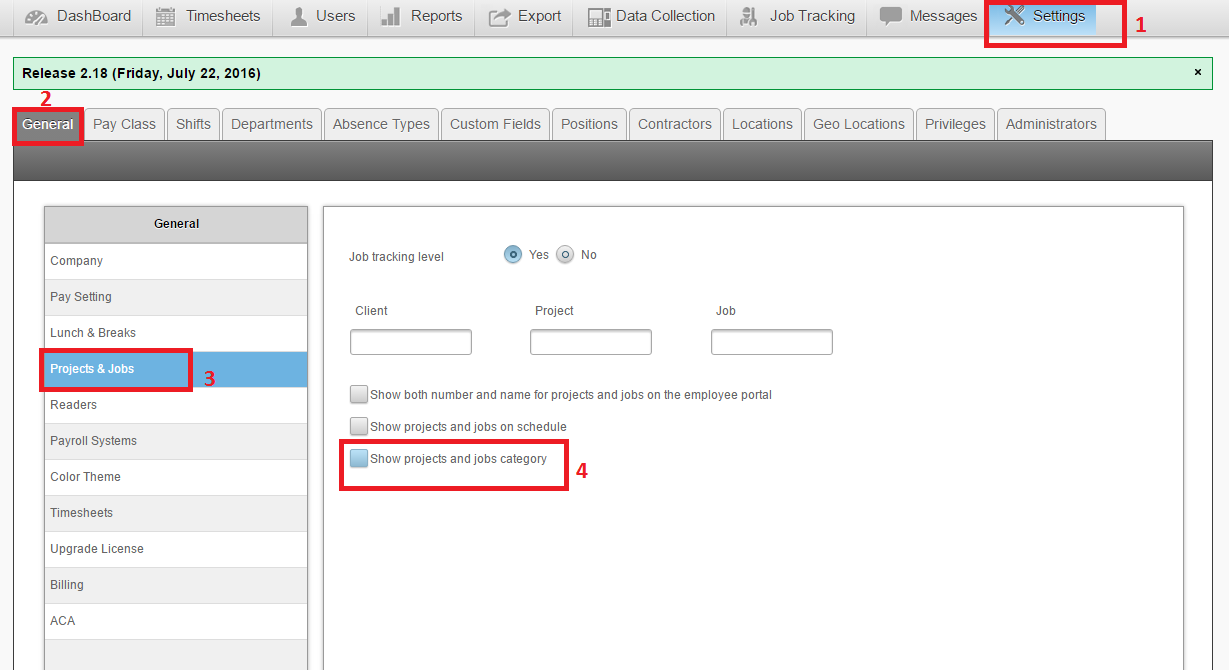
Now projects can be categorized either by innovation or sustain. This is a feature that must be enabled in the Projects & Jobs settings.
To enable this setting:
- Settings
- General
- Projects & Jobs
- Click on Show Projects and Jobs Category
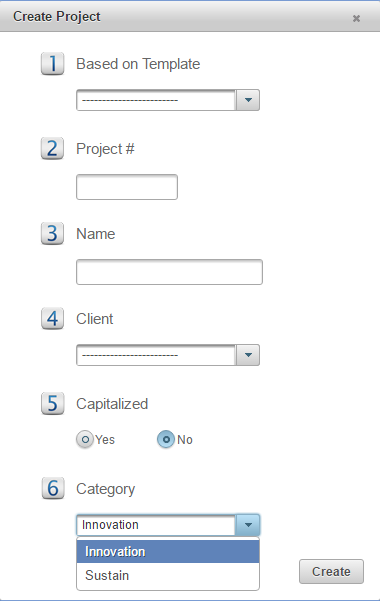
By enabling this feature, you will be able to select this option when creating a new Job, as can be seen below
New Salary Type Filter
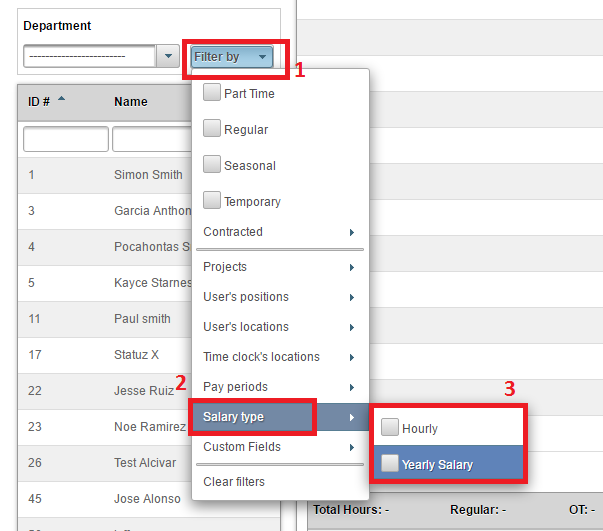
This new feature will allow the employees to be filtered by whether they are a salary or an hourly employee. The new filter can be used in the dashboard, users, and reports tabs.
How to filter using this setting:
- Click on Filter by
- Click on Salary Type
- Select the option that you would like to use to filter the list
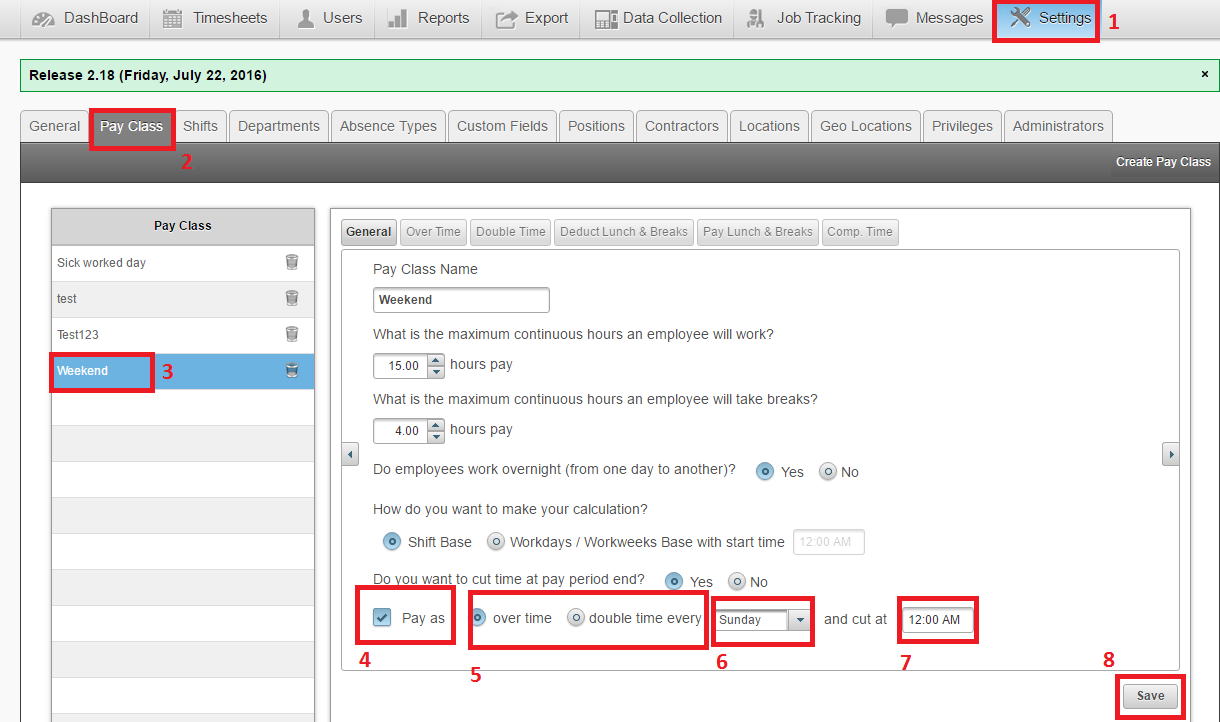
Pay as feature
Employers will now be able to pay certain days worked as over time or double time (For example: every Sunday worked should be paid as over time). This is a pay class setting and would need to be enabled on a pay class basis. This will allow you to set up this rule only for certain groups, if needed.
How to set up this feature:
- Settings
- Select Pay Class
- Select the pay class you would like to set up this feature for
- Select the check box for Pay As
- Select whether this day should be paid as over time or double time
- Select the day that this rule should be applied for
- The time for this setting will automatically cut off at 11:59PM. However, if you would like to extend this time until 12:00AM, you must manually enter the time.
- Click Save
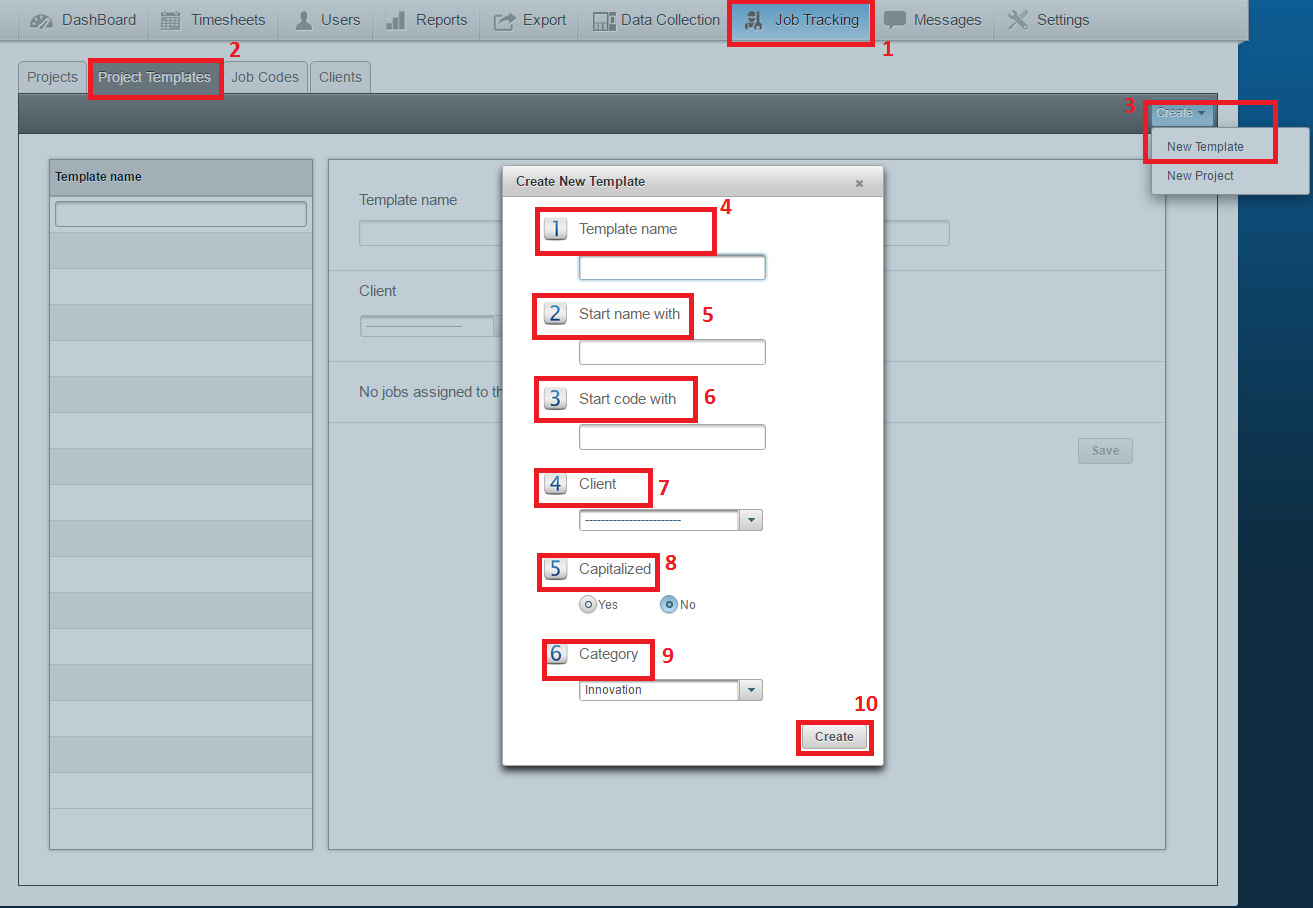
Setting up Projects Templates
Administrators will now be able to create templates for their projects and jobs. Templates can be edited and reused for similar projects in the future. This will allow administrators to create projects based on previous projects using similar jobs and the employees assigned.
How to set up templates for your projects:
- Job Tracking
- Select Project Templates
- Click on Create and then New Template
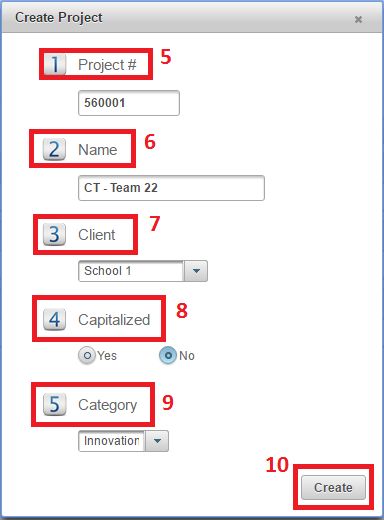
The box for the new template will appear
4. Enter the name for the new template (For example: if your company does Plumbing and Electric service projects for different clients you can create templates for both of these projects, which will in turn allow you to create projects in the future for new client based on these templates)
5. Enter the prefix that you would like to use for the projects that will be using this template (For example: if all of your construction project names begin with “CT” you can enter that here and it will default for all future projects)
6. Enter the default code that you would like to use for the projects using this template (For example: if all of your construction projects codes start with “56” you can enter that here and it will default for all future projects)
7. Here you can assign the client who you would be assigning future projects for
8. Select whether this project will be capitalized or not
9. Select a category for this project (if enabled)
10. Click Save
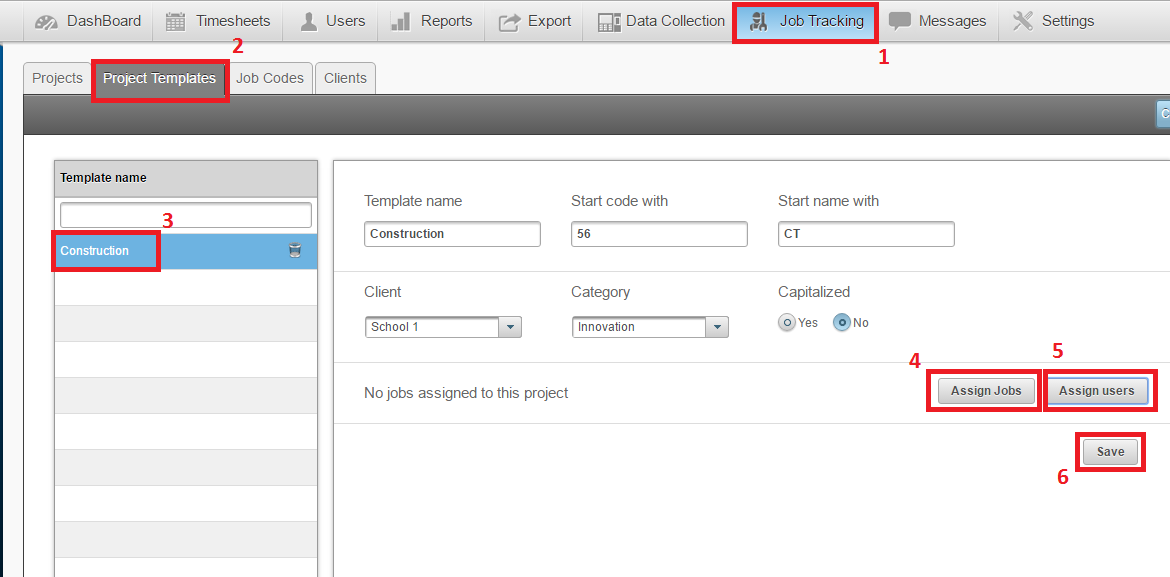
Assigning Jobs and Users to Project template:
- Job Tracking
- Select Project Templates
- Click on Template (previously created)
- Click on Assign Jobs and select the jobs that you would like to assign to this project template
- Click on Assign Users and select the users that you would like to assign to this project template (keep in mind that the users MUST be assigned to each project individually)
- Click on Save
Creating Projects using Templates:
- Job Tracking
- Select Project Templates
- Click on Template to use
- Click on Create & click Project
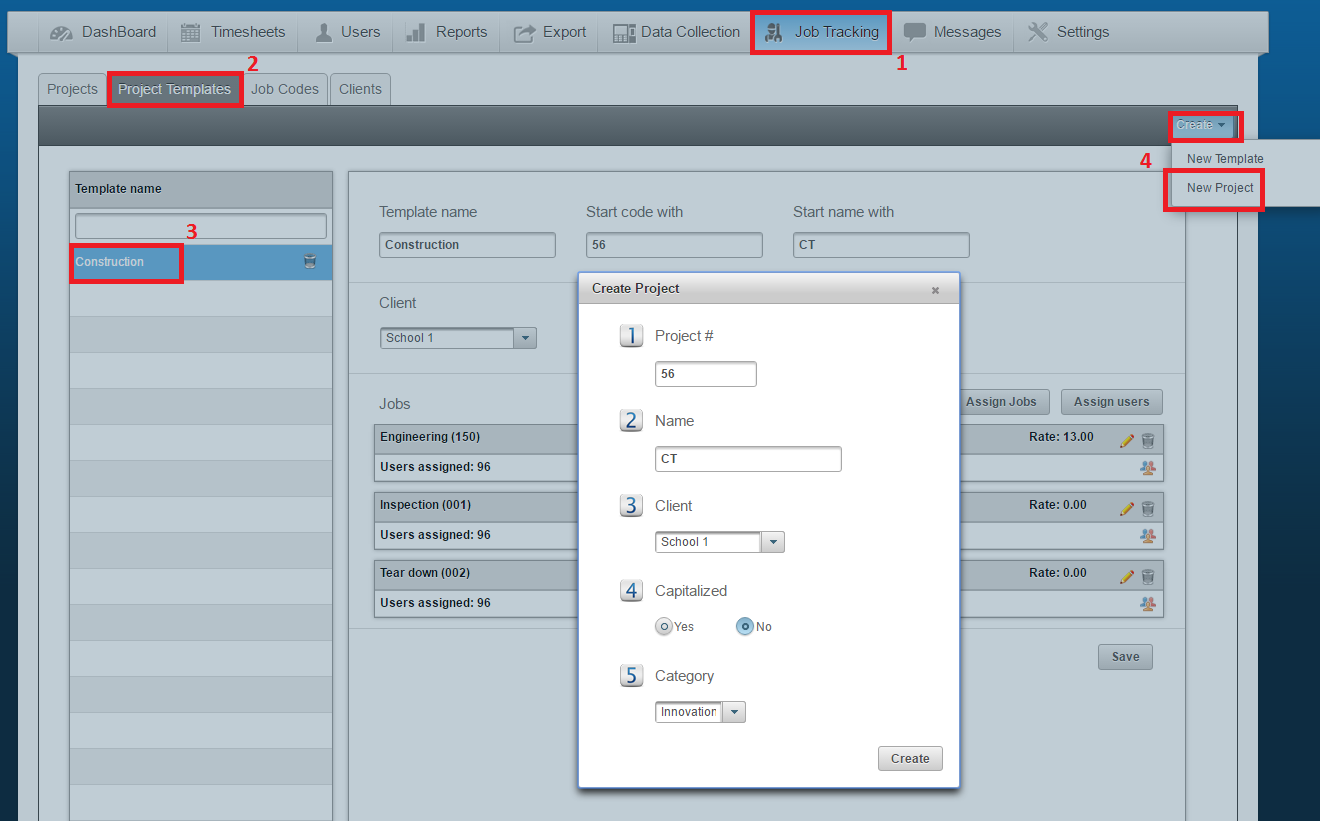
5. Edit the Project number that pertains to this particular project that you are creating.
6. Edit the Project Name that pertains to this particular project that you are creating.
7. Select the Client that this project will be assigned to
8. Select whether the project is capitalized or not
9. Select the category (if enabled)
10. Click on Save
You will now be able to find this newly created project using the templates feature under the Projects tab.
Salary Employee Features
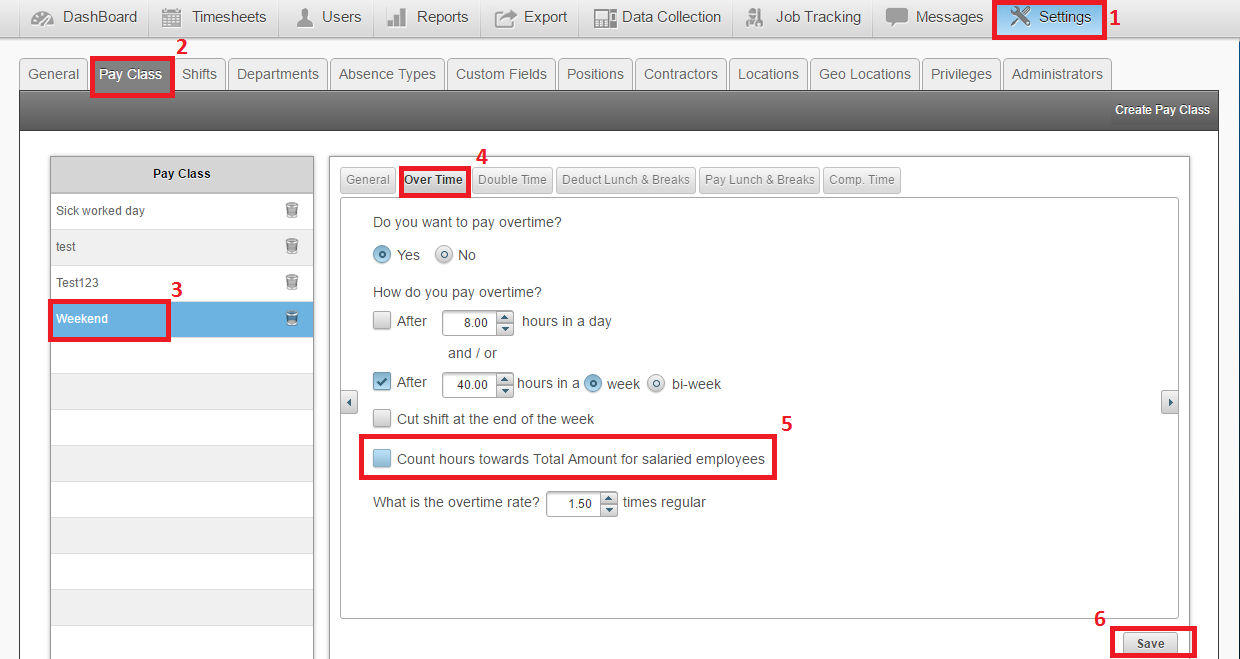
Easy Clocking will now allow companies to determine if overtime will be counted towards the total amount of hours and pay for their salary employees. This will allow companies whose salary employees are clocking in for attendance purposes only to view their time cards without any OT hours affecting the total amount.
How to use this feature:
- Settings
- Pay Class
- Select the Pay Class
- Select Over Time tab
- Select if you would like to have the OT hours count towards the TOTAL AMOUNT
- If selected, this will count the OT hours generated by your salary employees to count towards the total amount. Therefore, it will change the amount to be paid.
- If not selected, this will NOT count the OT hours towards the total amount. Therefore, the amount to be paid will not be affected.
6. Click Save
On either scenario the OT hours will still show on the time card, but this setting will determine if the total amount to be paid will change.
As seen in an example:
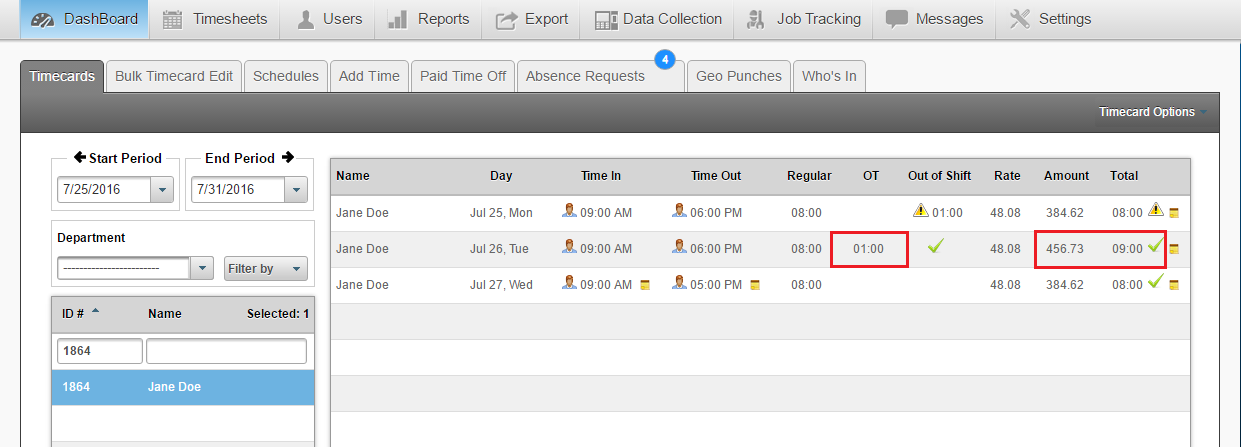
Example 1: Count hours towards Total Amount SELECTED
As you can see in this example, this employee has worked over time (which was approved). Since the feature is selected to count OT hours towards their total amount, the value changes to take into account the OT hour that was worked.
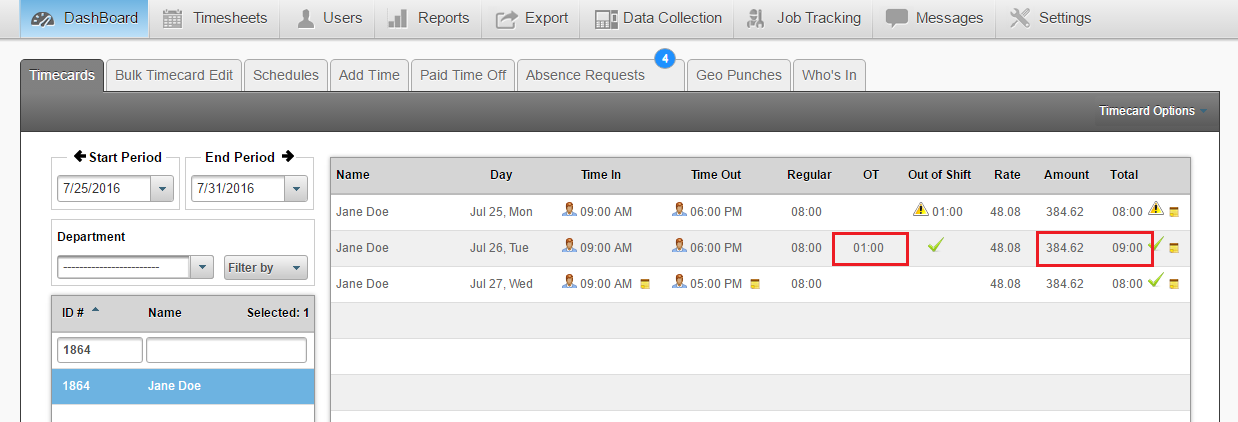
Example 2: Count hours towards Total Amount NOT SELECTED
As you can see in this example, this employee has worked over time (which was approved). Since the feature is not selected to count OT hours towards their total amount, the value does not change even though their total amount of hours have increased
Timesheets: Manager adding time
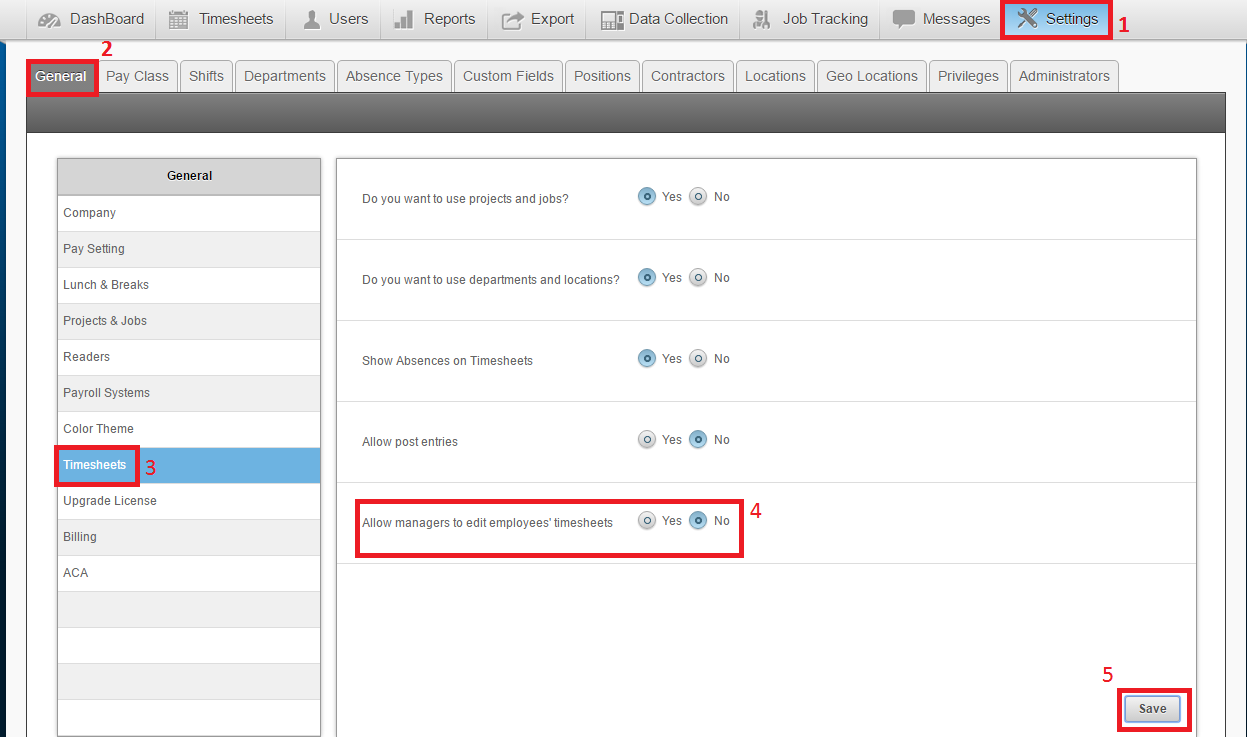
Managers are now able to add time on timesheets for their employees. This setting must be enabled in order for managers to be able to add the times to the timesheets.
To enable this setting:
- Settings
- General
- Timesheets
- Select Yes on Allow Managers to edit employees’ timesheets
- Click on Save
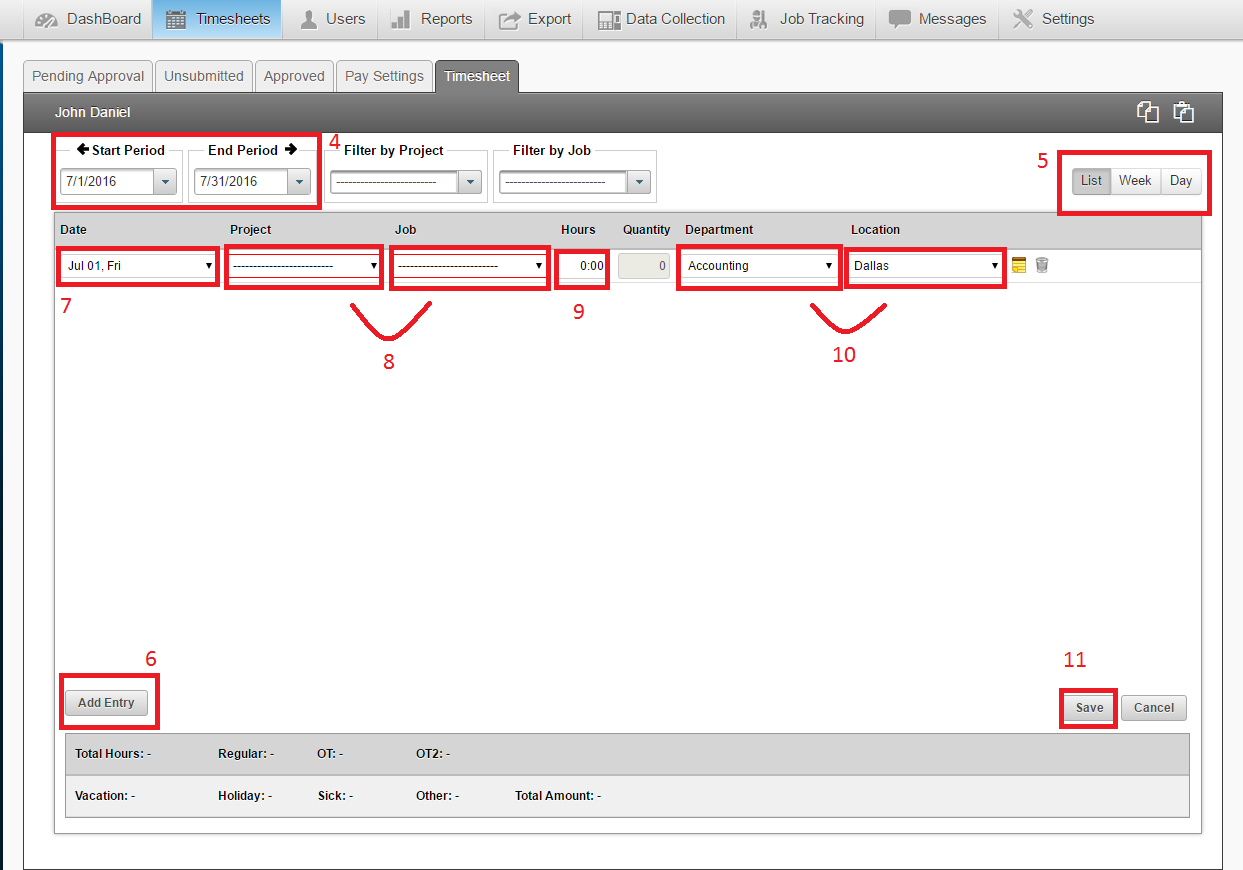
How to add time on time sheets:
- Timesheets
- Unapproved Timesheets
- Select the time sheet for the employee that you would like to add time for

4. Select the correct pay period
5. Select the format that you would like to view the timesheet in
6. Click on Add Entry
7. Select the date
8. Select the Project & Job
9. Add in the total hours worked
10. Select the department & location
11. Click on Save
You also use our Copy and Paste feature to create similar entries and thus, decrease the time for adding in time entries.
Press on the icon for copy. This will copy the last entry.
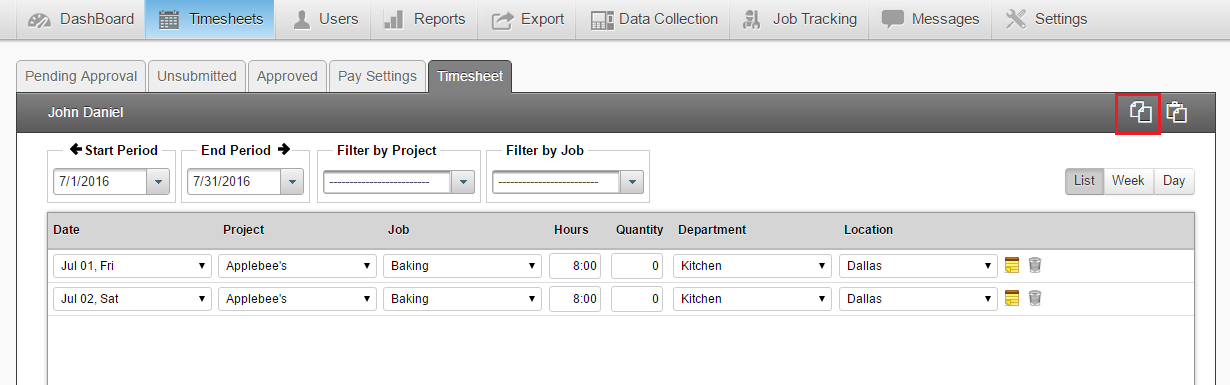
Select the icon for paste. This duplicate the previous entry. Be sure to update the date.

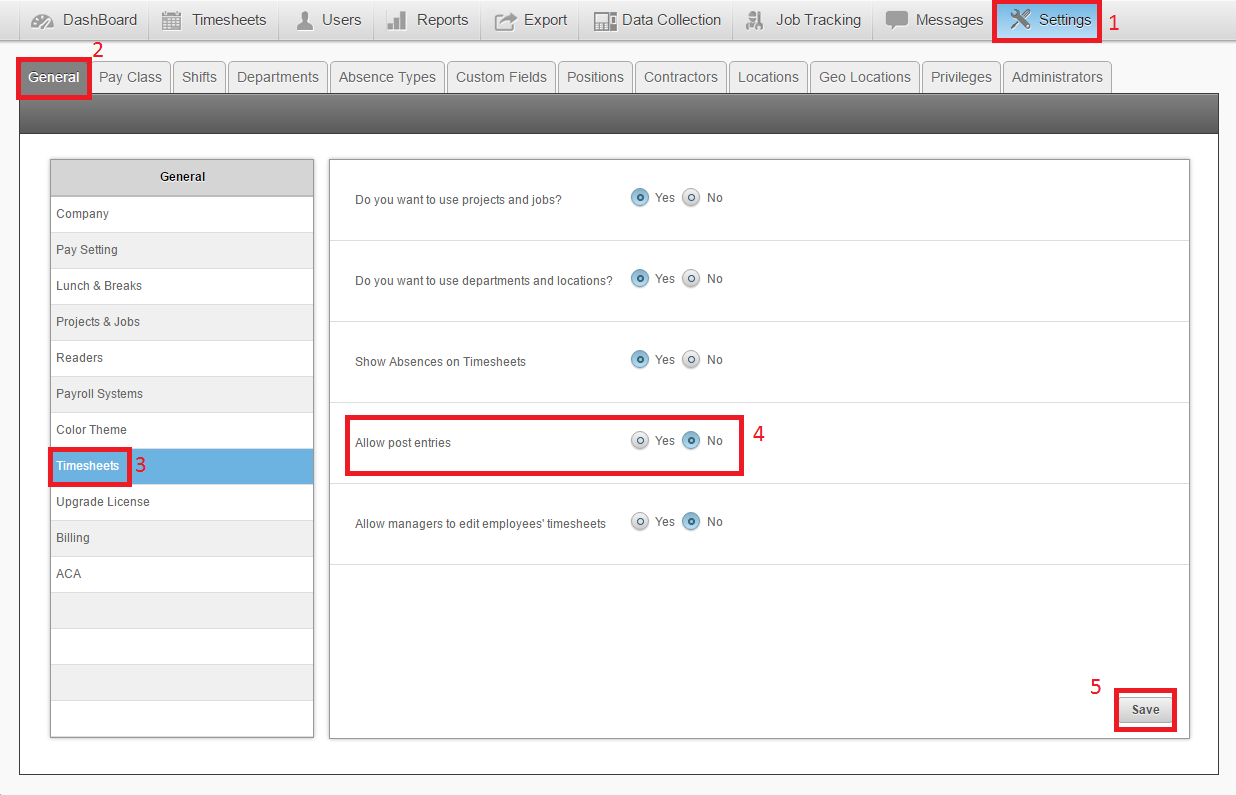
Timesheets: Post Time Entry
Employees using time sheets will now have the capability to create post time entries. This will allow employees to create time sheet entries for future dates. This is a setting that must be enabled by the manager. This setting is a companywide setting and cannot be enabled only for certain employees.
To enable this setting:
- Settings
- General
- Timesheets
- Select Yes on Allow Post Entries
- Click on Save
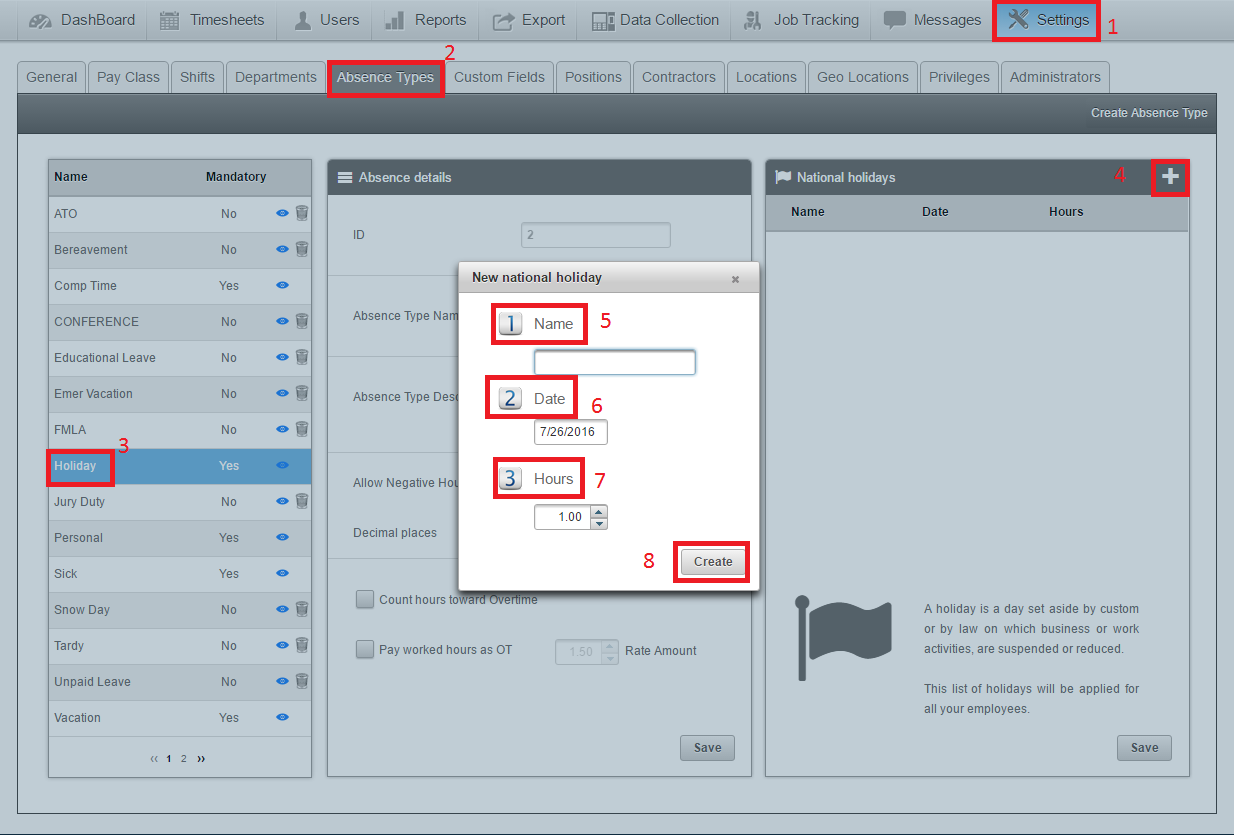
Preset National Holidays
The national holidays can now be preset for an entire calendar year. This setting will allow you to create absences for all of your employees on days that are known to be automatic holidays. These holidays can be created for an entire calendar year and will need to be reset at the beginning of each year.
To create the preset national holidays:
- Settings
- Absence Types
- Select the absence type Holiday
- Click on the “+” sign to add a new holiday
- Write the name for the holiday
- Select the date for the holiday
- Select the amount of hours to be paid on that holiday
- Click on Create