Release 2.12 – Saturday, September 5, 2015
Terminated Employee
An Employee that has been mark Inactive/Terminated, will still appear in all other Tabs, until the end of the Pay Period in which Termination occurred.
Example: This employee was marked Terminated on 9/9/2015.
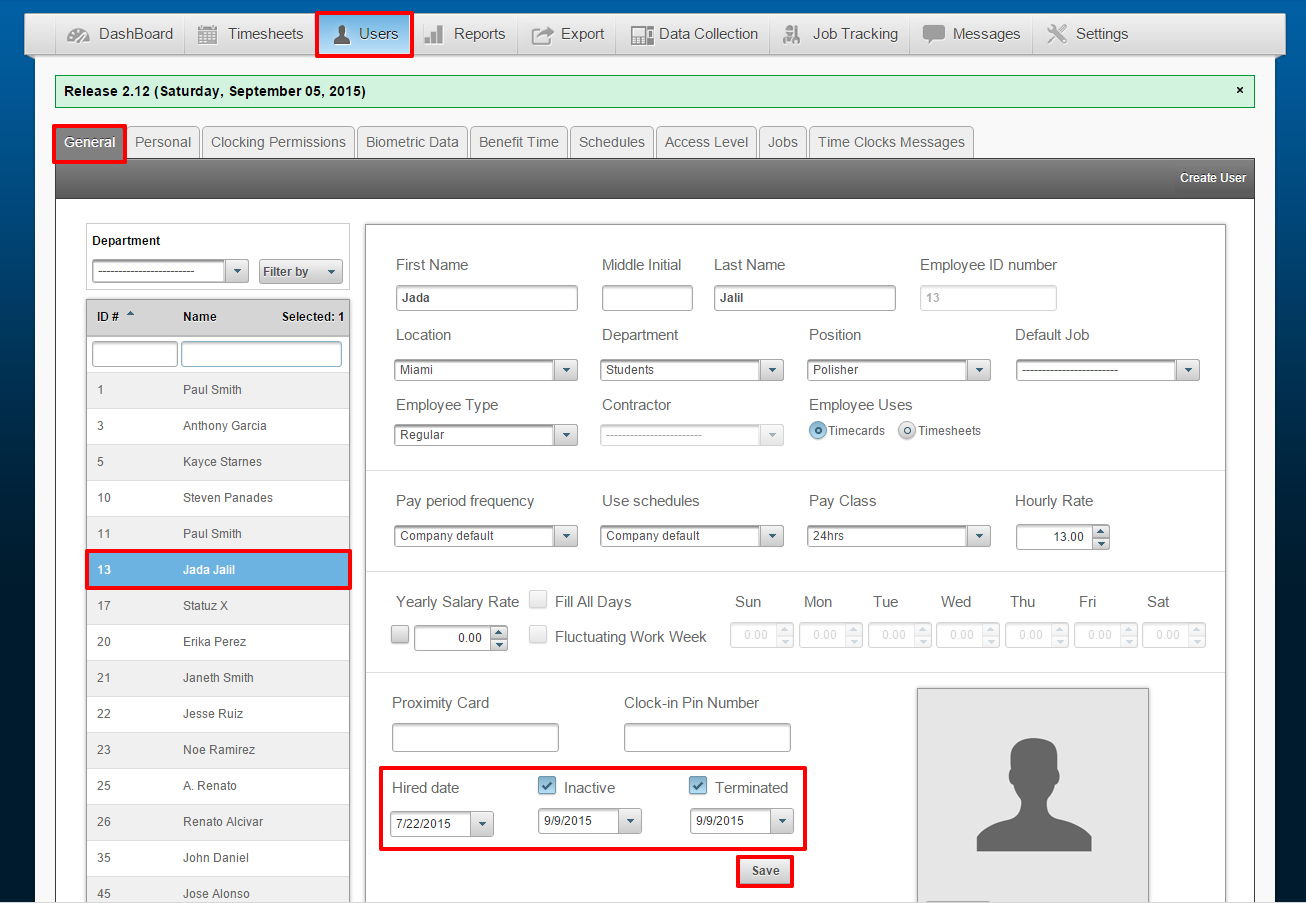
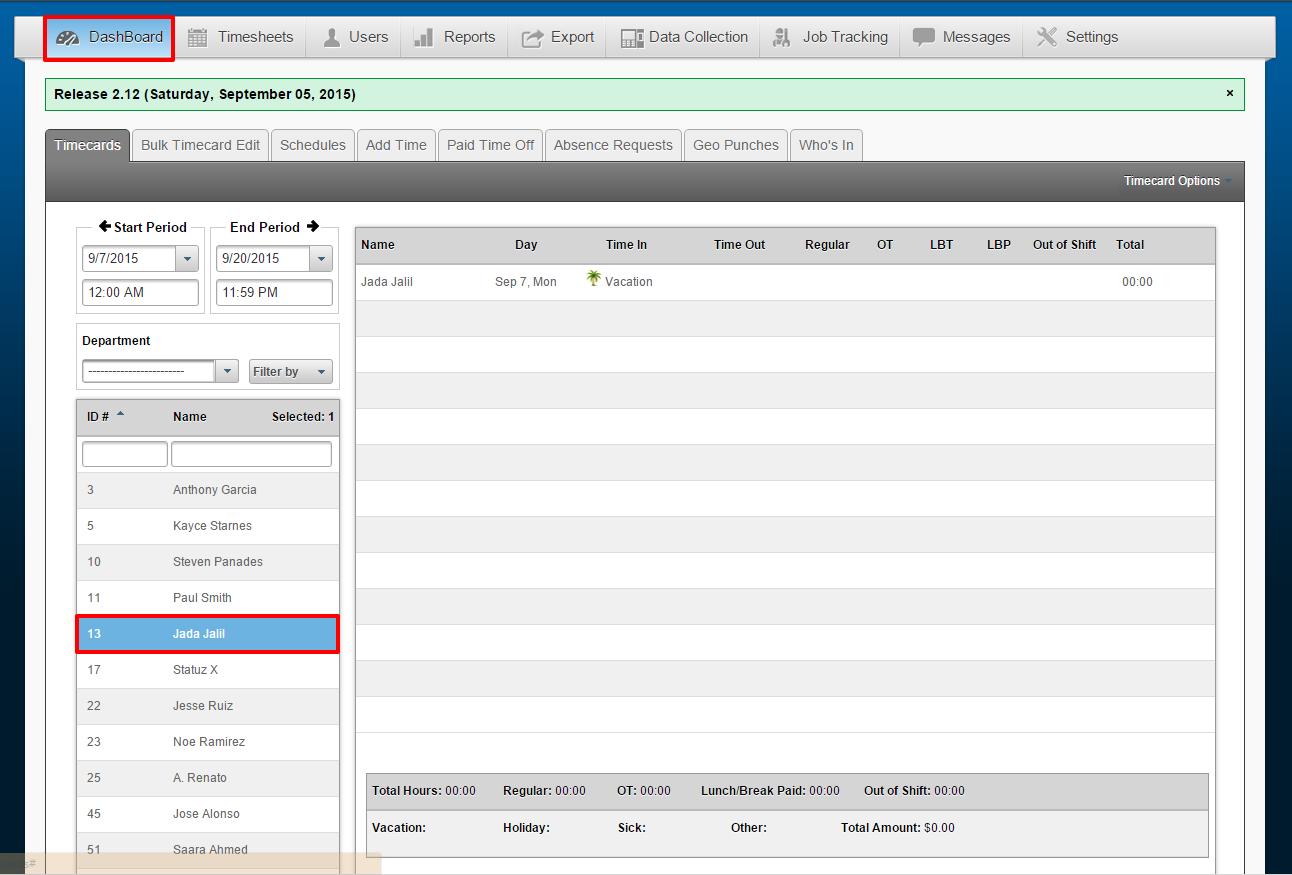
In the following screenshot, we are viewing the Pay Period where 9/9/2015 (Date of Termination) falls under and the Employee’s data is still accessible in the Dashboard Timecards. This is so that you may view the Employee’s time in/out, as well as any Reports to print out Employee data and/or the Export file to Export Payroll data for the remainder of the Pay Period.
Compensatory Time/K-time Updates
Employees can now collect Compensatory time from their Overtime and/or Double-time hours.
STEP 1 – To enable this feature, navigate to:
1. Settings
2. General
3. Pay Setting
4. Configure the settings
a. Do you want to use compensatory time? Yes/No
b. Use hours from Over time AND/OR Double Time
5. Save
STEP 2 – Next we need to navigate to the pay class to configure specific settings for Compensatory time.
1. Settings
2. Pay Class
3. Select Pay class
4. Click on the Comp Time tab
5. Configure the rules
a. Do you want to use compensatory time? Yes/No
b. What is the maximum amount of hours allowed to accrue.
c. Do you want to manually adjust compensatory time when approving the timecard?
i. With this option enabled, the employee can log into their portal and request the specific amount desired to be move to compensatory time vs the amount they want to be paid for. Example: A total of 5 Overtime hours. The employee can request to be paid for 2 of those hours, and have the remaining 3 moved to compensatory time. The administrator/manager would then review that employee’s time card, and approve/adjust how many hours the employee will be allotted.
d. Do you want to move hours to compensatory time by default?
i. With this option enabled, ALL overtime and/or double time hours (depending on the rules configured during the first step) to be moved to compensatory time automatically.
6. Save
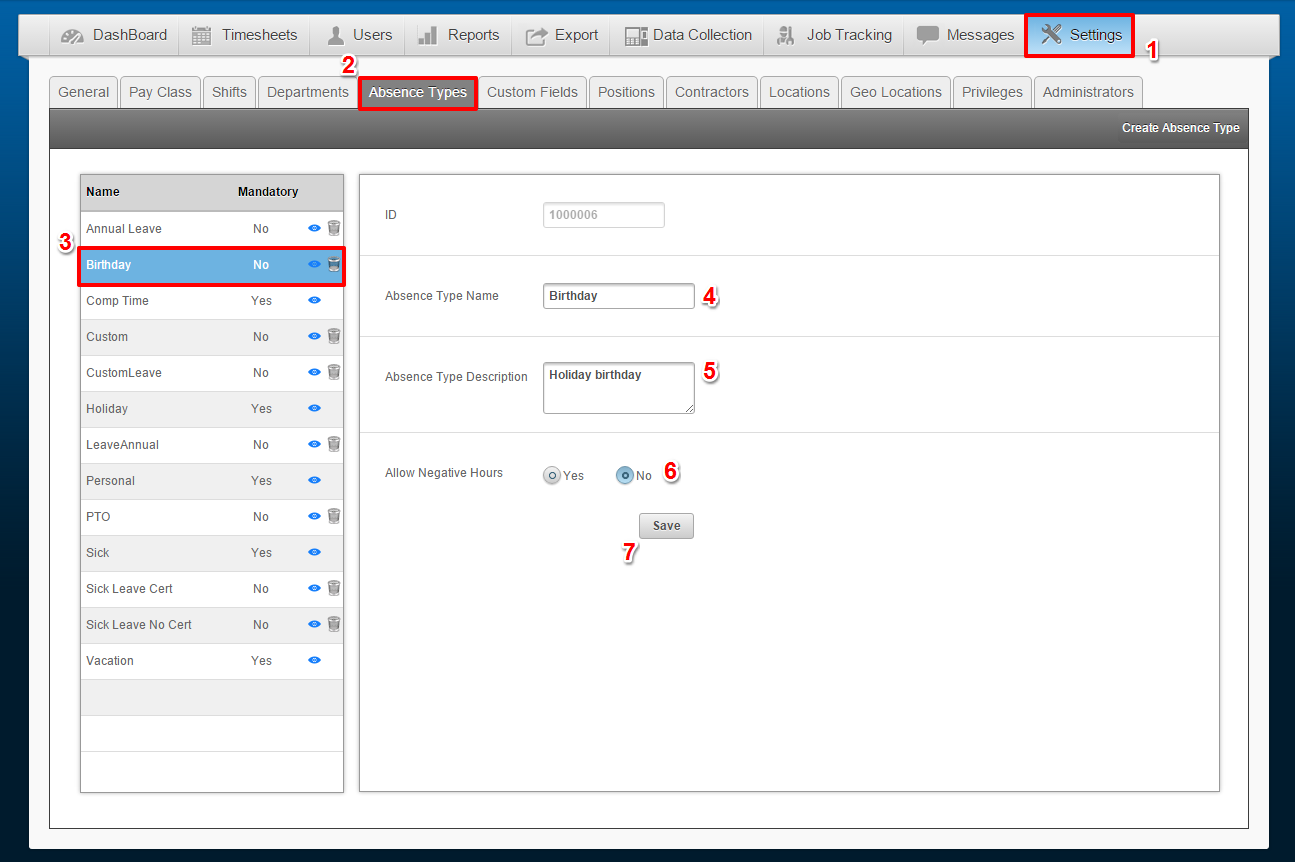
Holiday for Birthday
– New available absence type: Birthday
Administrators and Managers can now add an absence in the schedule for an Employee’s birthday.
You can find this under
1. Settings
2. Absence Types
3. Birthday
4. The Name can be modified
5. You can include a description toward the absence type
6. Allow Negative Hours – If this option is enabled and the employee does not have any hours available (0 Total), but has been approved to use any amount of PTO (Paid for 8 hours of time off toward any absence type), they would fall into a negative. Their PTO will show -8 hours that the employee has used.
7. Click Save once you have finished editing
You can also configure rules for an Employee to accrue hours toward the “Birthday Holiday.”
Navigate to:
1. Dashboard
2. Paid Time Off
3. Select the Employee
4. Add any amount of Hours available (if applicable) and Start Accruing Hours.
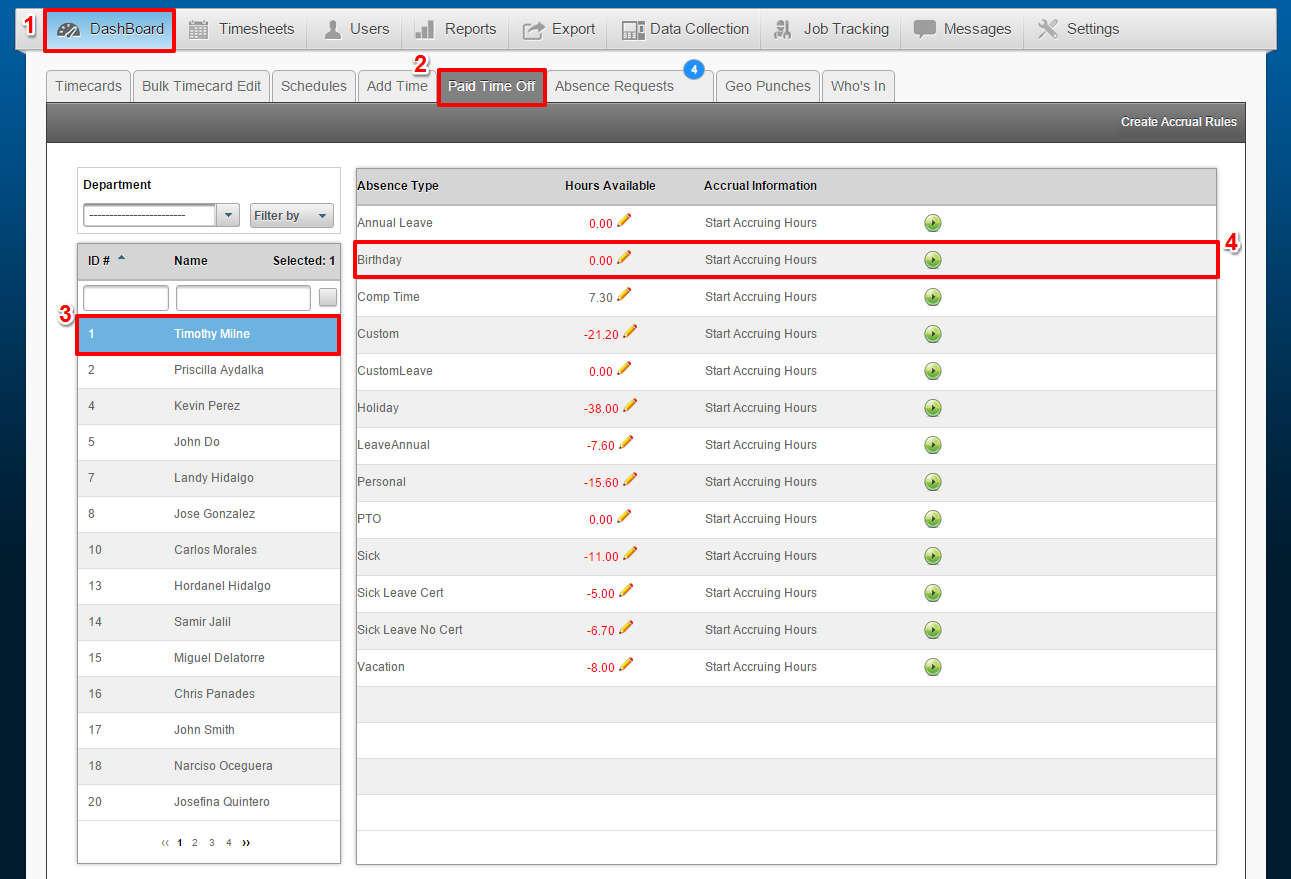
For more information on how to configure Accrual Rules, click Accruing Benefit Time
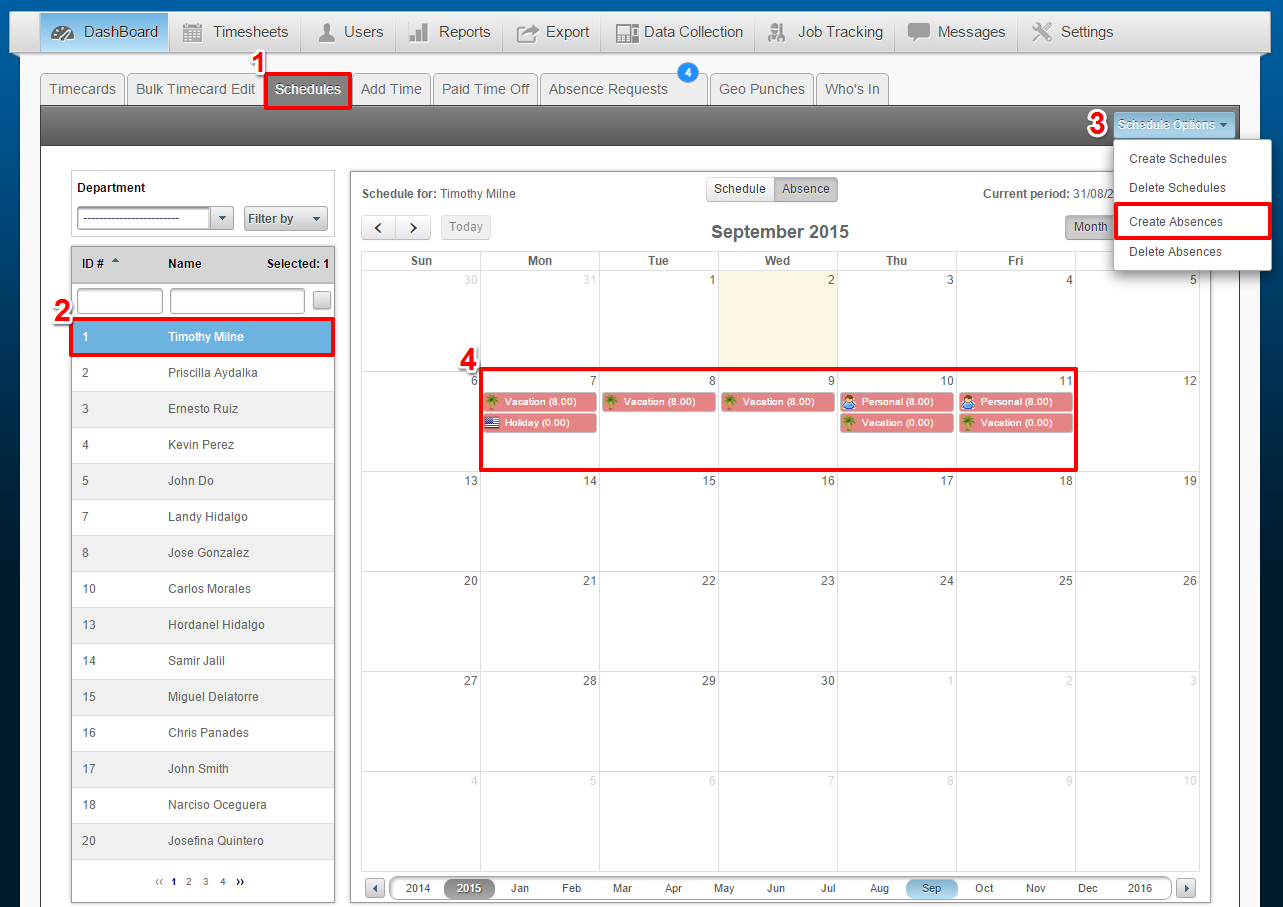
Multiple Absences
A new feature in our Absences and PTO module allows the Administrator or Manager to create multiple absences for any employee under a single date.
If the employee does not have enough hours under a specific type of PTO (example: Vacation) to pay for the amount of time they are requesting, the employee may use hours from another type of PTO (example: Personal) to complete their total. With our “multiple absence” feature, an administrator or manager can now mark both absence types in the employee calendar.
Under the Dashboard tab, navigate to:
1. Schedules
2. Select the employee(s)
3. Follow the Schedules tab to the right and select Schedule Options
a. Select create absences (Click here for more information on creating an employee absence.)
Repeat steps 1-3 for adding more than one absence on a single date.
4. The absences will appear in rows under the specific date(s) chosen.
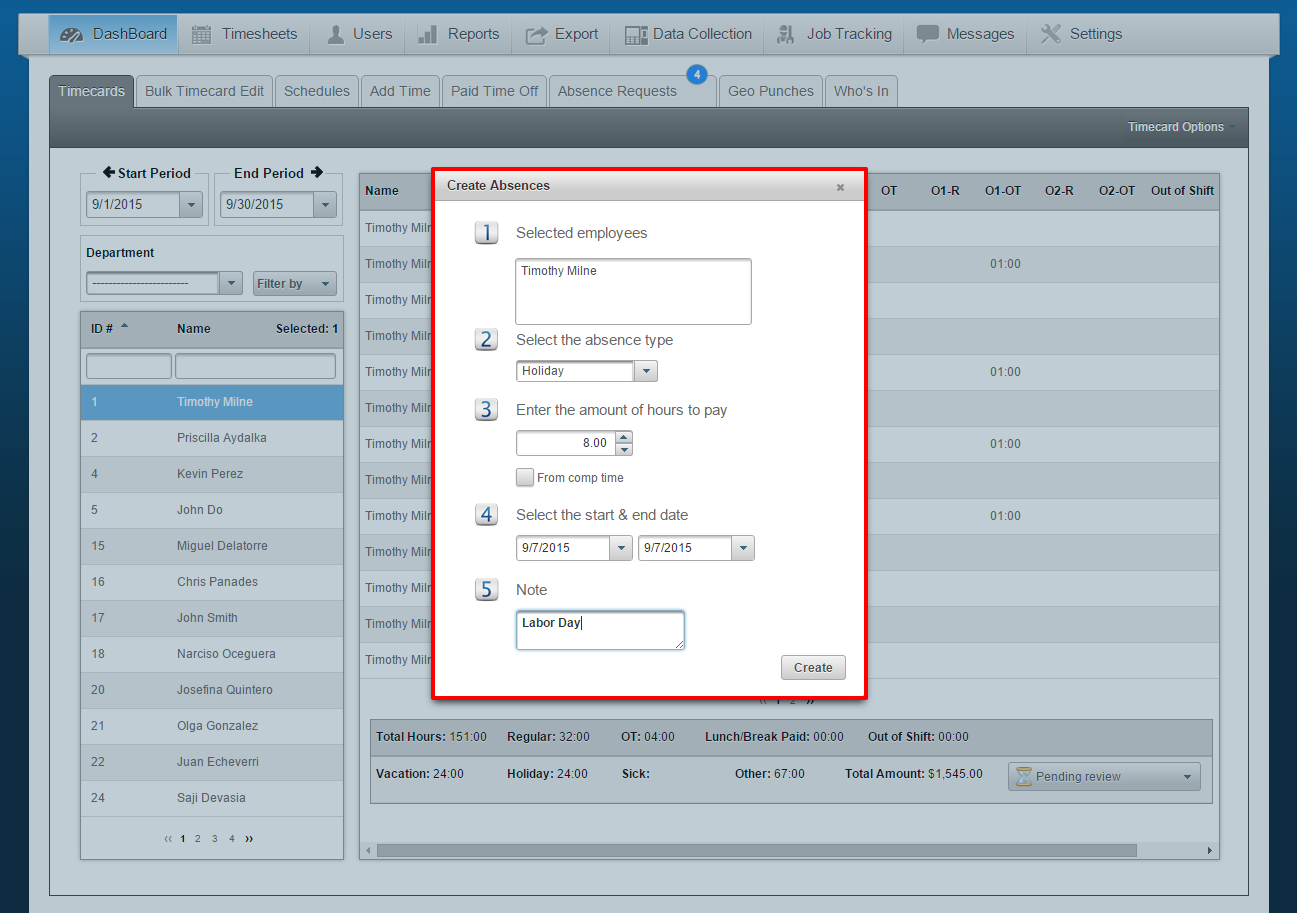
Create Absence from Time Card
A new “Create Absence” option within the Time Card Settings allows an Administrator or Manager to create an employee absence and add it directly to the Time Card, without having to shift over to the Schedules tab.
Navigate to:
1. Dashboard
2. Timecards
3. Select Employee
4. Follow Timecards tab to the right and click on Timecard Options
a. Select Add Absences

Next, the Create Absences window will appear.
1. Employee(s) selected
2. Select the absence type that you are applying. (Holiday, Sick, Personal, Vacation, etc…)
3. Enter the amount of hours that you will pay the employee PER DAY.
4. Select the start and end date(s) for the absence(s) you are creating.
5. A Note/Memo can be added.
Click Create.
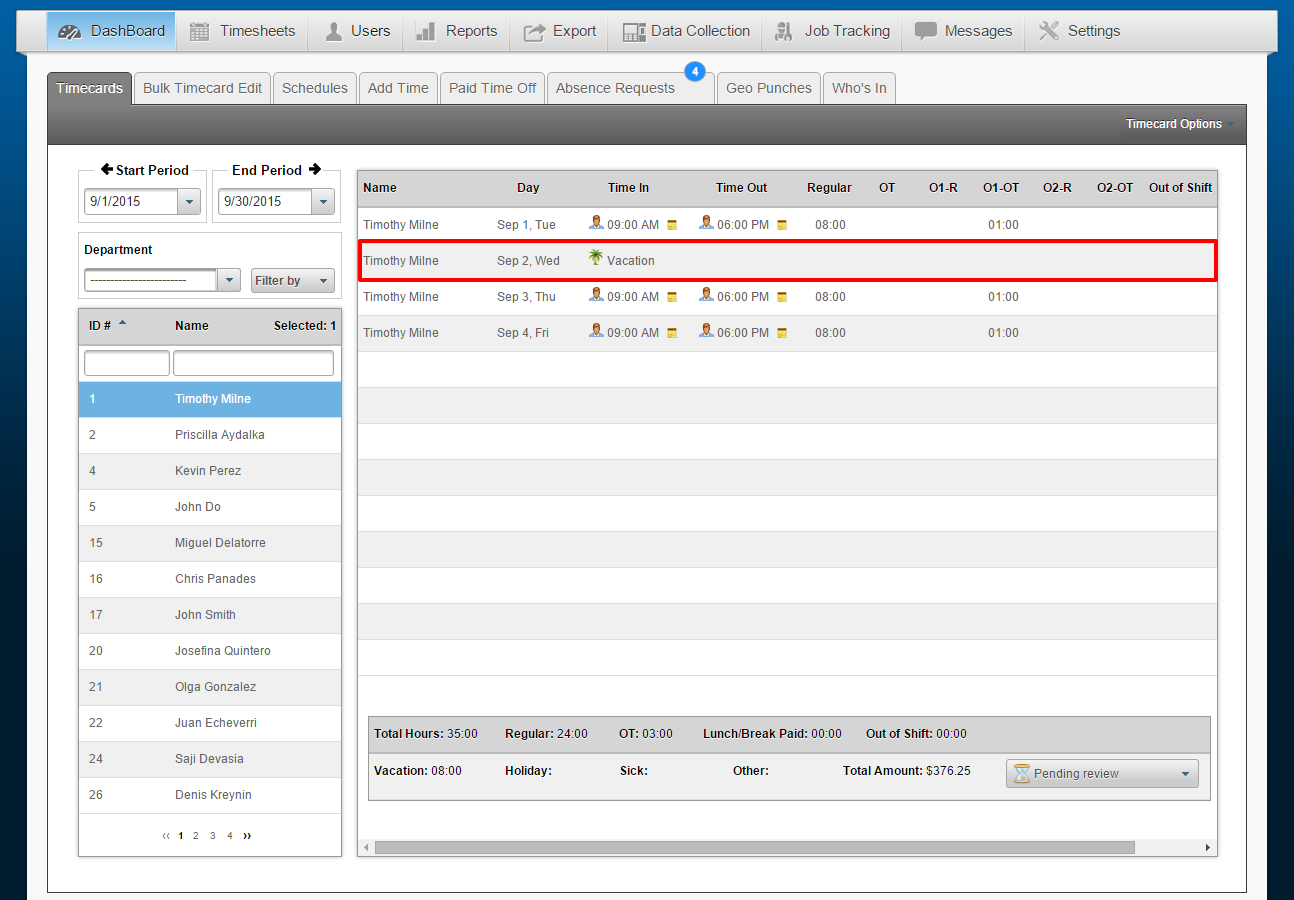
The Absences will be added on the Time Card as follows.
Time Card Filter
When selecting an employee under the Dashboard, the employee will remain selected throughout all other tabs without the need to re-filter them.
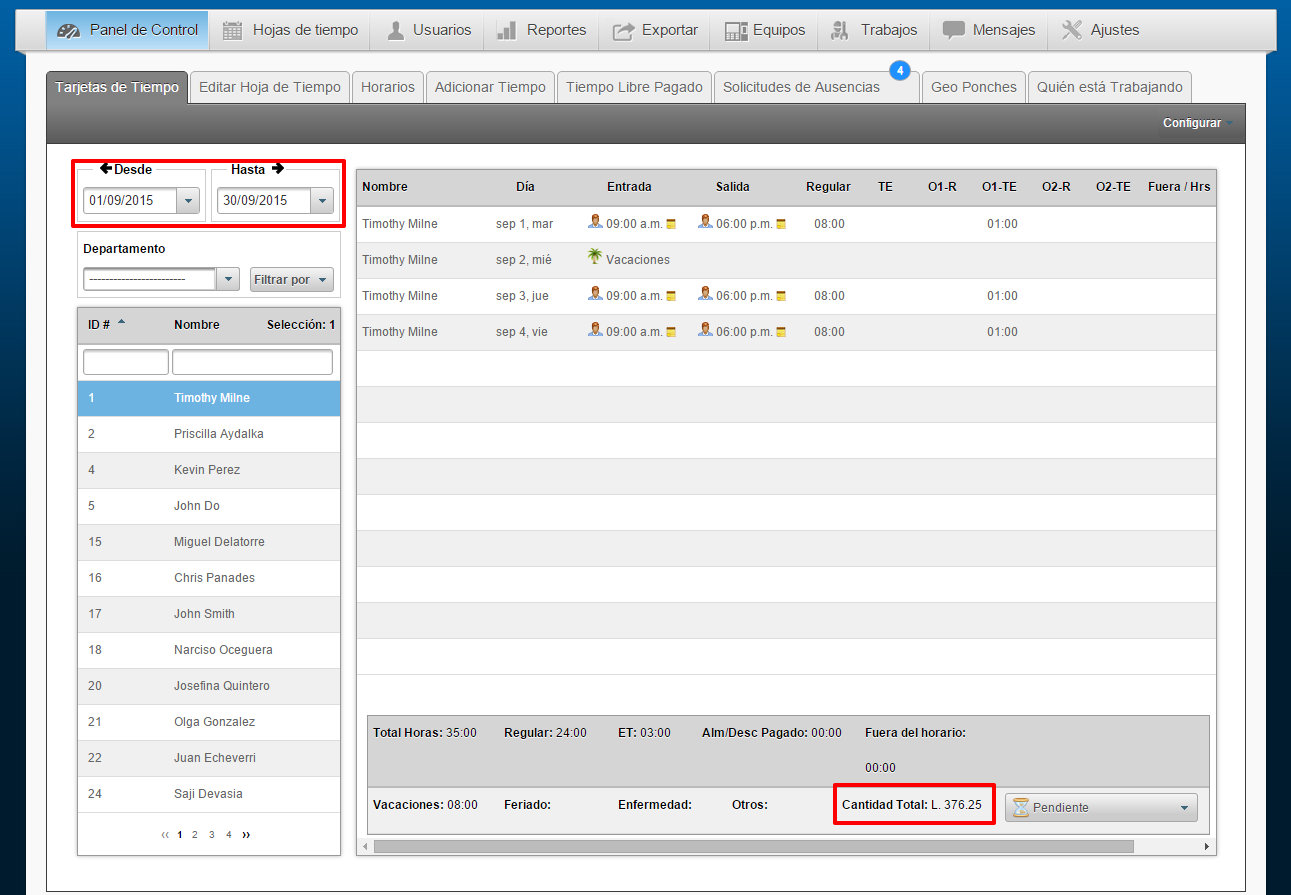
Honduras Setup
For Honduras selected as the main country for the company, the following software changes apply:
Multiple rates can be selected and assigned individually to employees, along with specified time slots for these rates.
Example:
9:00am – 12:00pm = $12.00/h
1:00pm – 3:00pm = $10.00/h
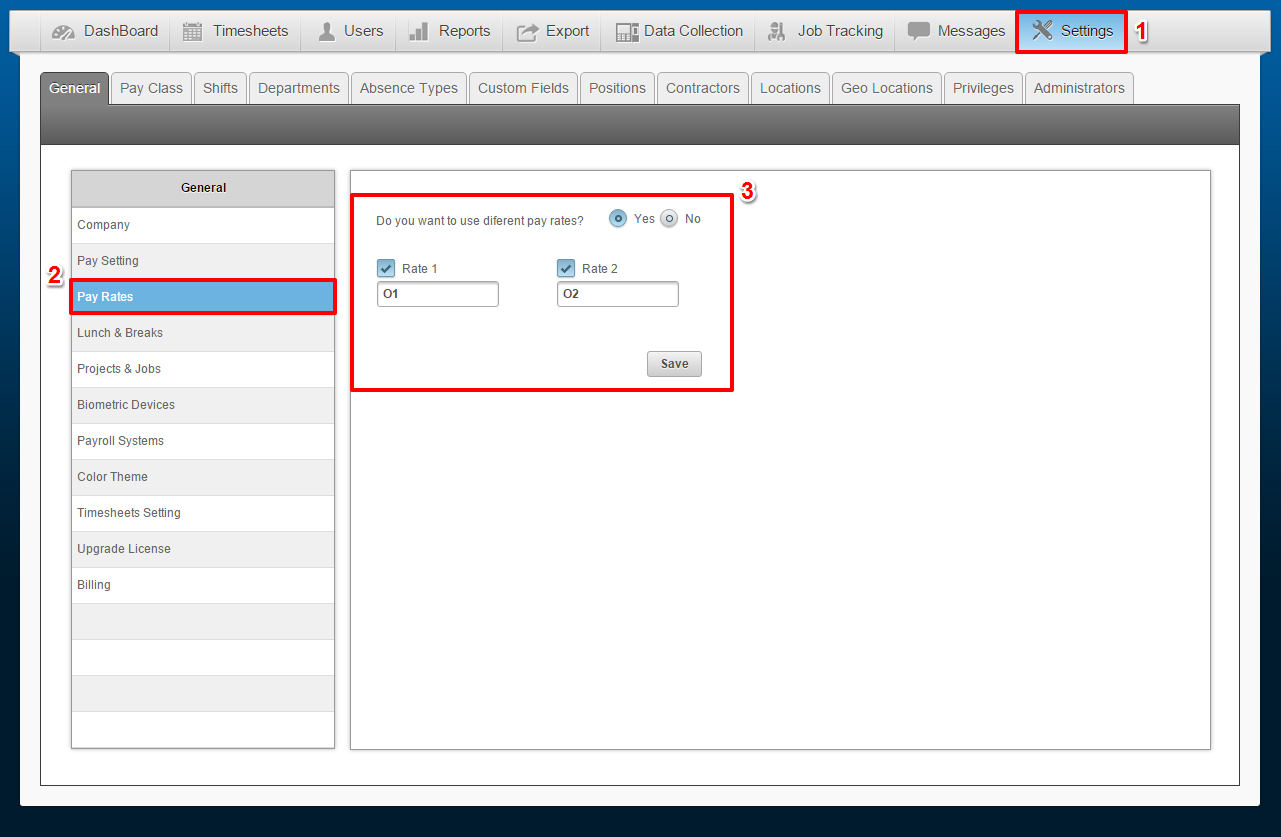
To enable this feature, navigate to:
1. Settings
2. Under General, select Pay Rates
3. Here, you may select a second or third rate to apply to employee(s.)
a. Enable: Yes/No
b. Enable Rate 1 and/or Rate 2, specify a name for the rate(s.)
Click Save.
Also, when selecting Honduras as the country, the currency and the date formats change.
Currency: L
Date format: Day/Month/Year | 09/01/2015
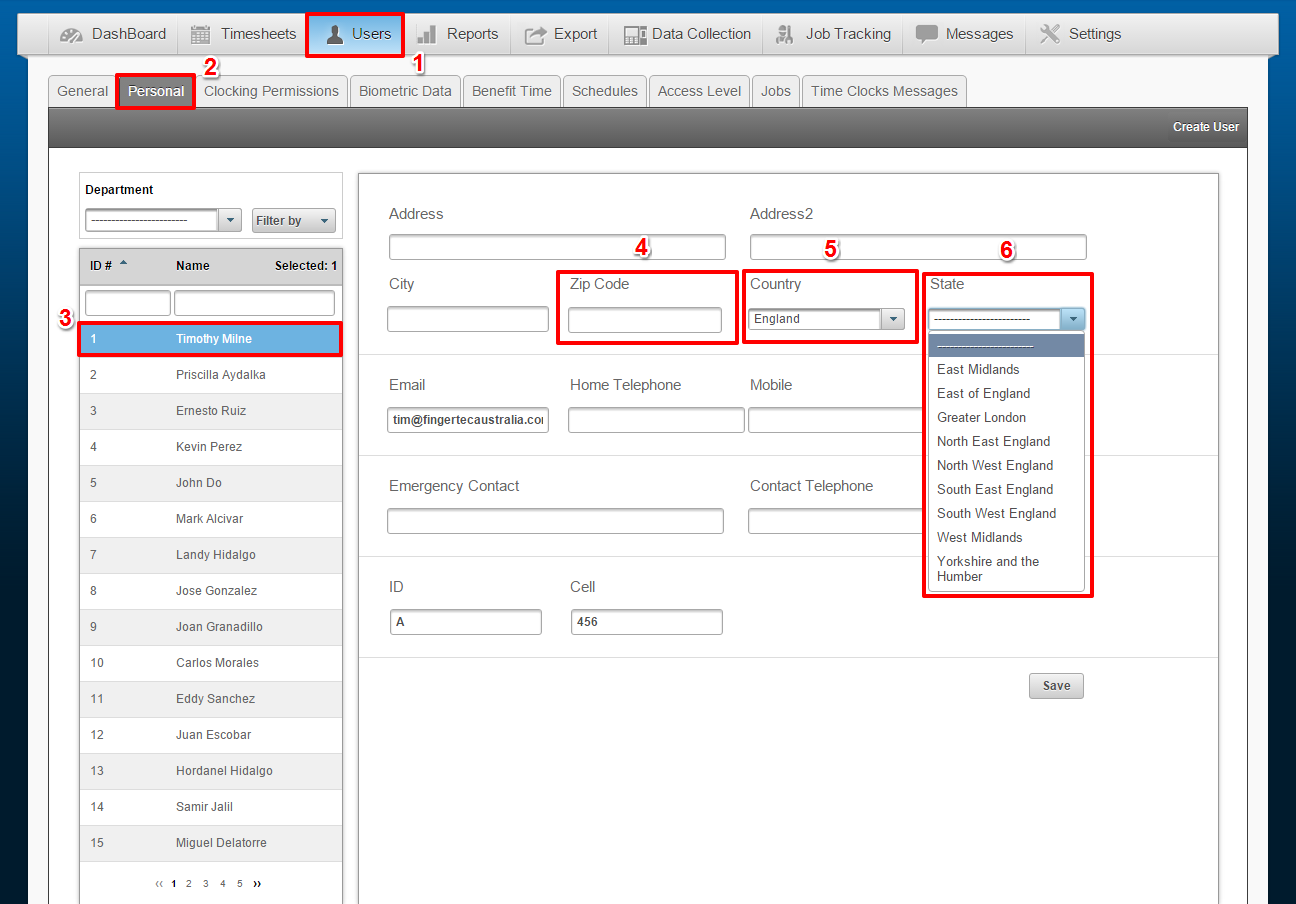
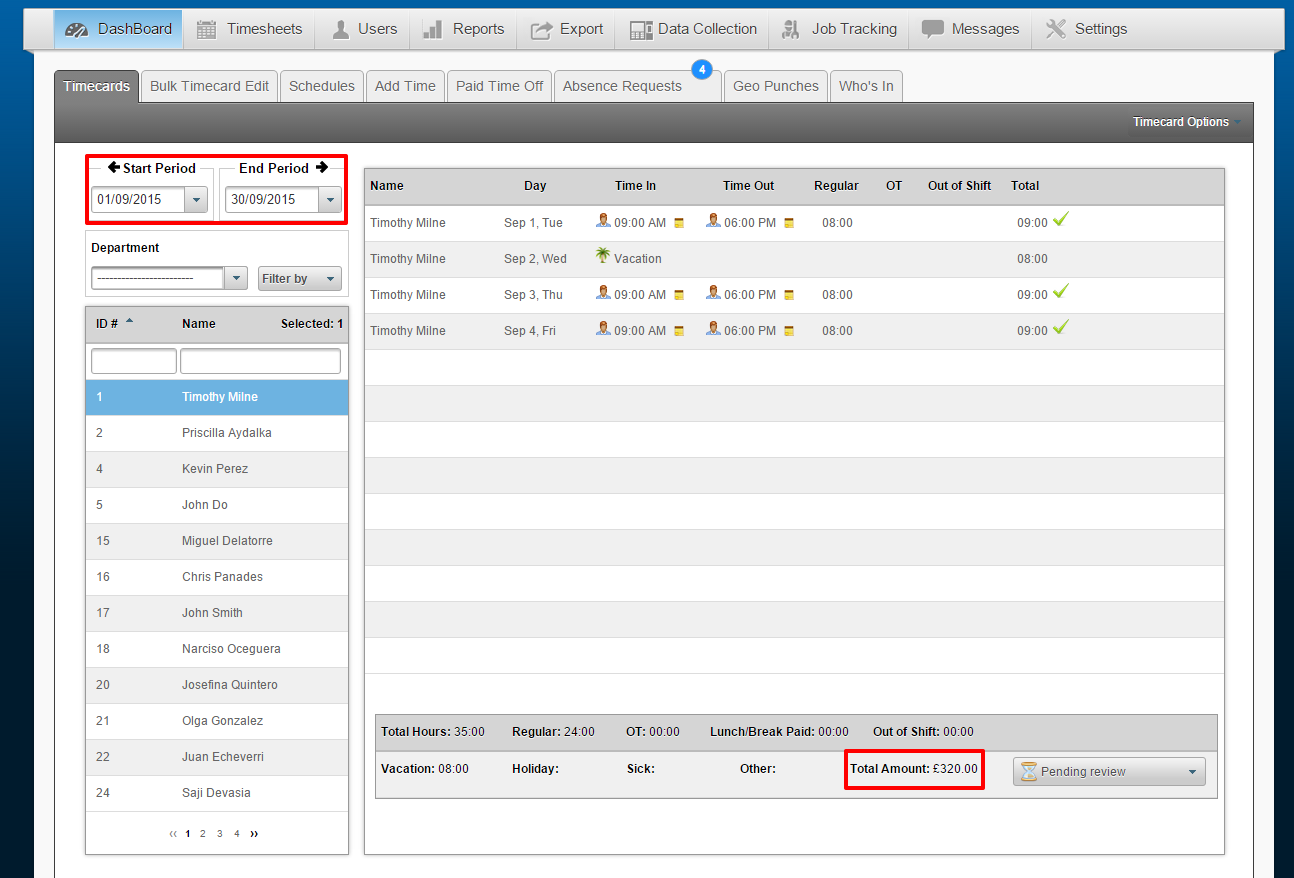
England Setup
For England selected as the country, the following software changes apply:
Currency: £
Date format: Day/Month/Year | 09/01/2015
You can now specify English States for each employee
Postal codes are accepted in English format
1. Users
2. Personal
3. Select Employee
4. Zip Codes will now be accepted in the English format
5. Select England as the User’s country
6. Specify the correct State
Click Save