
Clocking Permissions
Clocking permission defines how the employee will record time in the system. There are permissions to define which time clock(s), or computer(s) an employee will be allowed to clock in and out from, also the ability of clocking in using an app for smartphones. All of the different type of permissions maybe vary depending on the companies license.
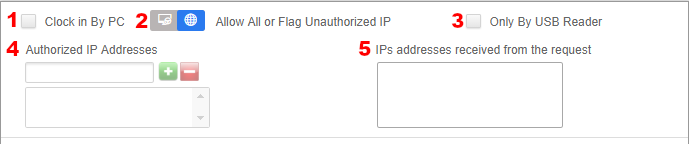
It is important that this procedure is done, as it allows the employee information saved on the software to be synchronized with the time clock(s) automatically. Also, if you wish to restrict from which computers and employee can clock in or out from, this is where you can assign these restrictions. To do this check mark the option of Clock In by PC. (See picture below)
To assign Clocking Permissions for an employee do the following:
- Click on the Users button.
- Click on the Clocking Permissions tab
- Click on the Employee Name
- Select the type of permissions to assign the employee
Clocking by PC:
This permission allows employees to clocking in/out using the a computer and they can be restricted to use only certain computers. The restrictions are done with the public IP address of the network where the computer is connected to. Other restrictions available are to only allow the employee to clock in/out using the fingerprints. (Note: this option only available with the EC20 Fingerprint scanner)
- Check the box to allow employee to clocking via PC
- Select if a PC punch should be restricted to a specific IP or allow/flag any non-listed IP Punches.
- Check to only allow employees to clocking via the PC using a USB fingerprint reader. (EC20)
- Enter the Public IP Address of the computer where the employee is allow to clock in and press the Plus sign. (+)
- This is the Public IP Address that was acquired from the network and it can be used as the allowed IP Address.
- Click Save.
Clocking by Mobile:
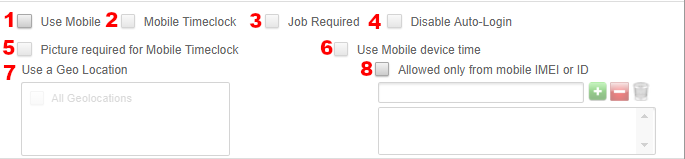
This permission allows employees to clocking in/out using the Easy Clocking mobile app, along with allowing them to view their time cards, view schedules and request time off. Also managers are allowed to manually add time for the employee using the mobile app.
- Check the box to allow users to access the mobile app
- Check the box to allow users Clock In/Out
- Check the box to limit the users to Clock In/Out only after selecting a Job (Note: Only used by companies with Job Codes)
- Check the box to require a user to enter login credentials each time they open the app.
- Check the box to require a user to take a photograph with each mobile punch.
- Check the box to require the mobile app to register the device time instead of the server time.
- Select the Geo Location from where the users are allowed to Clock In/Out. If no selection is made users can Clock In/Out from any location.
- This field will be automatically populated once the users logs in to the mobile app from any device. Once a IMEI or ID is entered they will only be allowed to use that device to access the mobile app.
- Click Save.
(Note: The IMEI or ID can be entered manually to allow users to access the app from different devices. For Android users can enter the IMEI of the device and add it to the list, for Apple users they would have to access the mobile app from each device and save the ID codes that appear on the list)
Clocking via Time Clock:
This permission allows employees to clocking in/out using the Easy Clocking Time Clocks and also send the employees names and fingerprints saved on the software. (Note: if the permissions are not saved the employee will not be able to use the time clocks)
- Select the time clock Menu level. There are three levels: Employee, Manager and Administrator, select the criteria which best applies to this user.
- Employee: Can only clock in or out from the clock, Cannot enter into the time clock’s menu.
- Manager: Can access the time clock menu to add, or delete users.
- Administrator: Has full access to the time clocks menu settings.
- Select one or more time clock(s) from the list under Registered Time Clocks, then click on the blue “single”
 right arrow to move the time clock to the Time Clocks Allowed To Use box. To move all of the time clocks over to the Allow list click on the blue double right arrow
  .
. - Click Save.
