Creating A New Employee
The entire process of an employee registration in the system consist of the 3 following steps:
- Register the employee profile on the software (See instructions below)
- Assigning the new employee Clocking Permissions .
- Register employee fingerprint at the time clock .
To add employees in the software do the following:
- Click on the Users tab, then click on the General tab.
- Click on the Create User button located on the right of the screen.
- Enter the employee’s information as described:
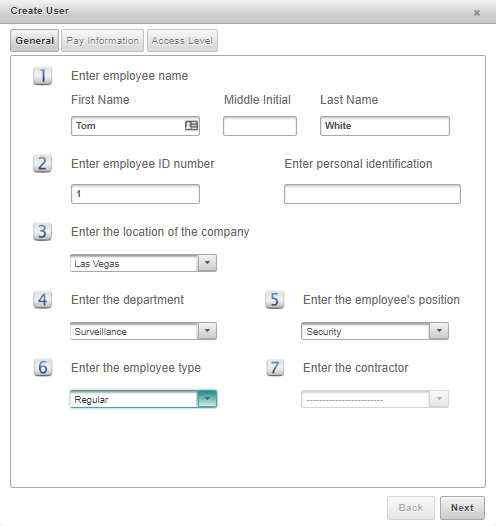
General
-
- First Name, Middle Initial, Last Name: The employee’s name Required Field
- ID Number: 1-8 digit employee ID number, this ID number is also used as the employee ID on the time clocks. Required Field
Personal Identification: Additional ID/Identification for your employee, useful for Alphanumeric employee ID’s. Optional Field - Company Location: This is the company location the employee belongs to. Required Field
- Department: The department the employee belongs to. Required Field
- Position:The position the employee works within the company (example: Accountant, Sales, Customer Service)
- Employee Type: Select if the employee is a Regular, Contracted, Seasonal, or Temporary employee. Required Field
- Contractor: If the employee is a Contracted employee, you can select what contractor they would belong to.
- Click Next
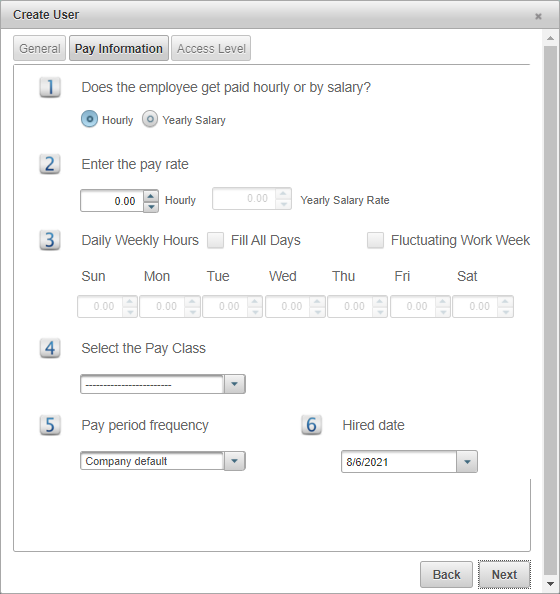
Pay Information
-
- Salary Type: Select if the employee is paid hourly or by salary.
- Pay Rate: Enter the hourly pay rate or yearly salary rate
- Daily Weekly Hours: If the employee is Salary, selecting Fill All Days will equalize the amount of hours worked along the full work week by entering the amount of hours on each weekday. Fluctuating Work Week is a method for paying overtime for employees whose work weeks vary. For more information with this method contact the system administrator.
Apply Holidays: This function works along side the PTO module, Allowing any previously set company holidays to apply to a new hire. - Select if the employee uses Time cards, Time sheets or Construction. (Optional)
Time cards is used for employees who clock IN/OUT via the time clock, mobile app or computer.
Timesheets is does not require the user to clock IN/OUT, but instead would allow the user to enter the hours worked per shift manually. (Will work in conjunction with Projects & Jobs)**
Construction is used for Foreman/Supervisors who would take employee punches and allocate time properly (Per Project & Job). [Schedules/Job Tracking Modules Required] - Pay Class: This is a set of rules governing how an employee gets paid. See Pay Class for more details.
- Pay Period Frequency: Select the pay period method for the employee. Company Default is the pay period frequency set for the company. See Pay Settings for more details
- Hired Date: Enter the date when the employee was hired.
- Click Next
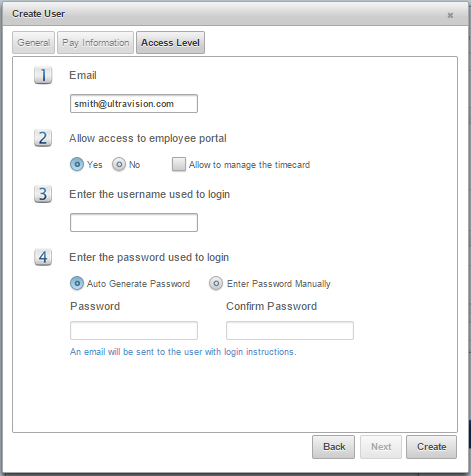
Access Level (optional)
- Email: Enter the email address of the employee.
- Select Yes or No to allow employees access to the Employee Portal. By clicking Allow to manage time cards the employee will be able to edit their own time cards, if not checked the employee will only be able to to view the time cards.
- Username: Enter the username used to login.
- Password: Enter the password used to login. Auto Generate Password is a password generated by our system, Enter Password Manually allows the password to be entered manually.
- Click Create, and the new employee will display on the list of employees.
- You must add Clocking Permissions to each employee in order to sync the employee to a time clock.
NOTE: There is more relevant information that can be added to each employee profile such as address, telephone number, mobile, email, emergency contact, etc. This information can be added by clicking on Users, then clicking on the Personal tab. An email address will be required on the employee profile if the employee has access to the Employee Portal, or if you wish to assign this employee administrative privileges using Access Levels .